My love for lemons runs deep. I can’t go a day without using one or a week without buying more of them. I like starting my day out with a cup of hot lemon water, I make vinaigrettes and marinades with them, I use them to keep cut fruit from browning… you get the picture. But one thing I definitely don’t do enough of is use them as the main attraction in a dessert. Lemon cookies, cakes and pies sound wonderful, so why aren’t I making them?
When I saw this recipe for a lemon tart, I knew it was meant to be. I was imagining it to be a lemon square in tart form and it’s not too far from that. The tart itself is, well, very tart (in the lip puckering sense) and sweet—kind of like really good lemonade. And my addition of the raspberries makes this tart even better (trust me)!
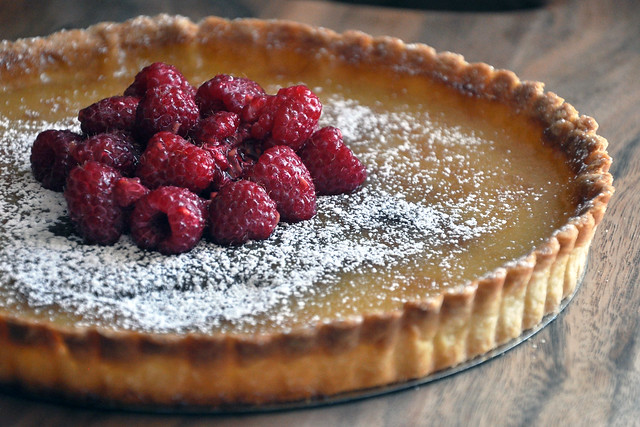
Lemon Tart with Raspberries
Adapted from William Sonoma Cooking Essentials
Crust:
1 1/2 cups flour, plus more for dusting
1/4 cup sugar
pinch of salt
1/2 cup unsalted butter, cut into cubes, room temperature
1 egg
Filling:
Zest of 2 lemons
Juice of 3 to 4 lemons (about 1/2 to 3/4 cup of juice)
3/4 cup sugar
1 egg, plus 1 yolk
3 tablespoons melted unsalted butter
Garnish:
6 ounces fresh raspberries
2 teaspoons sugar
Powered sugar for dusting
First, prepare the crust. Combine flour, sugar and pinch of salt in a large bowl and whisk until well blended. Add the 1/2 cup of butter and rub the butter into the dry ingredients with your fingertips until the mixture resembles coarse cornmeal. Add 1 egg and stir with a fork until the dough comes together. Use your hands to knead the dough to form a flat disk. Wrap the disk in plastic wrap and refrigerate for 30 minutes or until dough is firm enough to roll out.
Preheat oven to 400 degrees. Roll out the chilled dough about 1/4 inch thick and transfer to a 9-inch tart pan. Trim access dough with a knife. Chill tart shell for 30 minutes. Line the chilled shell with parchment paper and fill with pie weights or dried beans and place on baking sheet. Bake for 15 minutes. Remove the weights, reduce the heat to 350 degrees and bake for an additional 5 minutes or until lightly golden.
Let the crust cool and make the filling. In a large bowl, beat 3/4 cup of sugar with 1 egg and 1 egg yolk until pale yellow (this will take a few minutes with an electric mixer). Slowly pour the melted butter into the egg and sugar mixture, beating constantly. Stir in the lemon zest and lemon juice.
Pour the filling into the cooled tart shell, place on a baking sheet, and bake at 350 degrees for about 25 to 30 minutes, until the filling is firm and the crust is golden (if the filling does not firm up in the oven, it should firm up while it cools). Let the tart cool completely on a wire rack, then remove it from the tart pan and keep it chilled in the fridge until serving. Meanwhile, combine raspberries and sugar in a small bowl and use a fork to crush some of the berries to release some of its juices. Before serving, dust the cooled tart with powdered sugar and top with the macerated raspberries.
Makes one 9-inch tart.





{ 4 comments… read them below or add one }
Hello there,
I just made your lemon tart (it’s actually still cooling so I’m not too sure of the turn out) and I had a question. I know this is the comment section, but I’m worried my tart is a dud. your directions say to cook until the filling is firm. However my filling never got firm….. problem? or is this somewhat normal being that the filling is very liqudy? I baked @ 350 for 35 minutes and trying not to risk burn the crust I took it out without the filling being firm.
Any-who i loved this recipe it was very easy to follow and used ingredience that most people always have on hand. I hope mine turns out.
-Monica
Hi Monica! Did your tart turn out okay? If you find that it needs to be baked longer, using a pie crust shield will prevent your crust from over-browning (if you don’t have one of those, you can use aluminum foil to cover the crust).
Hi,
I had the exact issue as Monica. At 35 minutes it wasn’t at all firm, so I left it in the oven, but eventually gave up.
Hi ladies, I made a few additional notes in the recipe to help clarify things! Hope that helps!